Tello EDU Drone Python Programming Tutorial & Product Review
Published by shannon.simpson on
Tello EDU Drone Python Programming Tutorial & Product Review
Hello and welcome to Sincerely Shan! In this post, I’ll be providing an overview of the Tello EDU drone by DJI & Ryze Technology and teaching how to program it using Python. This is meant to be a guide for anyone from beginners to more experienced programmers looking to get started with drones!
Product Review

The Tello EDU is a lightweight programmable drone that’s designed for STEAM (Science, Technology, Engineering Arts and Math) education and programming skill development. I found out about the Tello EDU thru my undergraduate honors thesis and yearlong dream of putting a small drone show into one of my dances [https://youtu.be/oudcsqte71M]. At the beginning of my spring 2020 semester, I started my project, Design of an Autonomous Drone Swarm Choreography Performance, [https://youtu.be/cAn4k64TGp4] and ended up choosing the Tello EDU to complete the project.
The Tello EDU drone is remote controlled using the Tello app for your phone and has a bottom camera that supports its navigation vision system and a front camera that can be used to take aerial photos and videos. When I started using my Tello EDUs I was still a beginner in drone operation. (The one time I tried flying a small RC drone prior to my Tello experience, it quickly came crashing down.) However, I found the Tello EDU app interface and drone controls to be very intuitive and user-friendly. I was wary at first given my previous (and only) experience flying a drone, but in no time I was using the various features of Tello EDU such as hand landings and zooming/fly out videos.
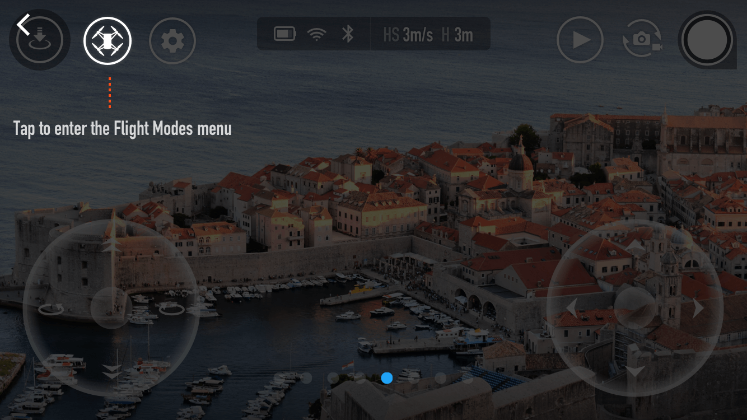
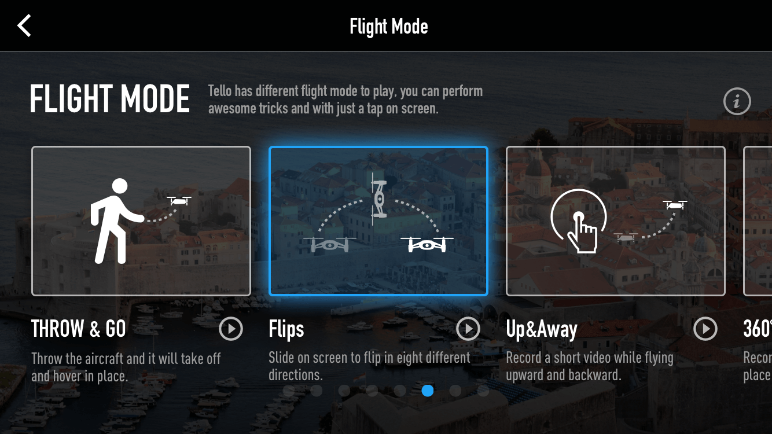
The drone can translate in all directions and rotate around its center vertical axis using the joystick-like controllers in the app. It also can be used in one of its 6 flight modes, 8D flips, Up & Away, Circle, 360, Throw and Go, and Bounce mode. My favorite’s being 360 and Up and Away for making cool panorama videos or zooming out on a video subject. The drone has a 5 megapixel camera and shoots 720p video.
Overall, I really like the Tello EDU and would recommend it to anyone looking to get started using drones. It was a great experience getting comfortable flying drones while getting to simultaneously grow my programming abilities and shoot cool (not premium quality but still visually intriguing) drone footage all thru this one device. The Tello Edu costs $129 and the regular Tello is $99. The Tello has all the programming capabilities of the Tello EDU except for the use of mission pads and swarming.
Purchase Tello: https://amzn.to/32H4L9g
Purchase Tello EDU: https://store.dji.com/product/tello-edu?site=brandsite&from=landing_page&vid=47091
How to Operate Tello
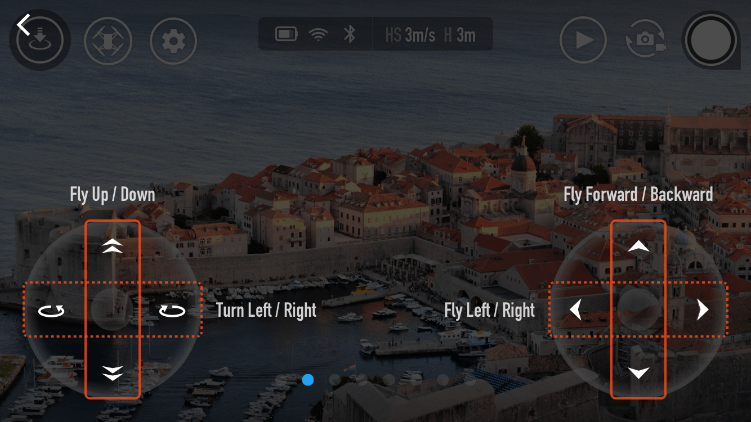
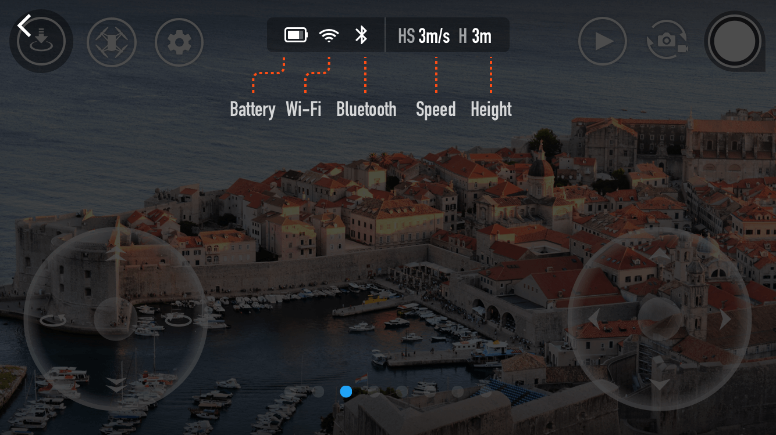
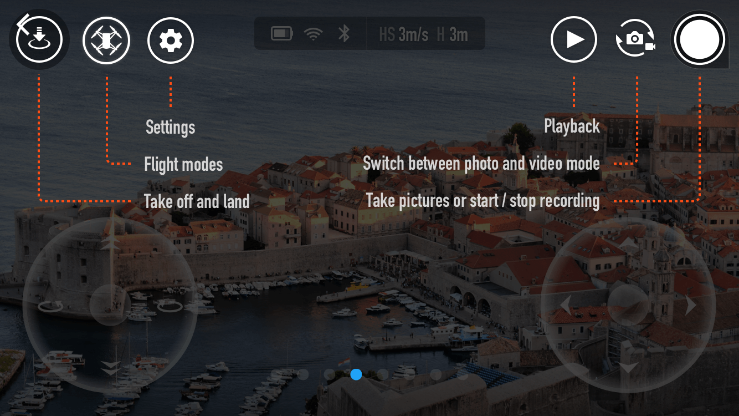
Now before we get into the programming, I want to briefly describe how to manually use Tello EDU. It’s probably a good idea to get used to its operation before programming just to eliminate the culture shock of having a flying object so close to you for the first time. You can fly Tello by downloading the Tello app to your phone and then connecting to the Tello WiFi network. Once connected, you will see the front camera footage appear on the screen along with the Tello controllers & indicators. Prior to your first takeoff, you may need to do a firmware update and calibrate the IMU. This can be done by clicking the setting button (gear icon) and then the “more” button to get to the ellipsis icon button. Once there you can click “calibrate” and “update” to do so. I can’t remember if the battery for Tello came fully charged so you may also want to charge the battery before your first flight if you’re hoping to use all of its 13 min flight time in the first go. Charging requires that you use a certified USB adapter that is rated at 5V and 1.5A or above and the Tello EDU comes with a USB to mirco USB cord that plugs into the micro USB port on the aircraft. Once you’re charged and ready to fly you can operate the Tello using the onscreen controls and indicators shown below. For more detail on manual operation of Tello, you can also consult the Tello user manual (https://dl-cdn.ryzerobotics.com/downloads/Tello/Tello%20User%20Manual%20v1.4.pdf).
On to The Programming!
In this tutorial, I will be sharing how to accomplish a simple drone flight demo for a single Tello EDU or Tello. The flight motions in this particular demonstration include the takeoff, vertical displacement, spin about the vertical axis, and flips. Additionally, we apply the battery read command to obtain the battery level while operating the drone. My starting point in all of this was the Tello SDK 2.0 User Guide PDF (https://dl-cdn.ryzerobotics.com/downloads/Tello/Tello%20SDK%202.0%20User%20Guide.pdf) and the Tello3.py code. Editing of the code was done using Pycharm community, which can be downloaded here: https://www.jetbrains.com/pycharm/download/#section=windows The Tello SDK describes how to connect and control the drone using python and describes the various commands, such as “takeoff”, “up x”, and “cw x”, and what they do. Tello3.py is provided for reference in the SDK and it contains code to receive and send signals to the drone and code that allows the user to type in commands and then execute them on the drone. What we will accomplish in this tutorial is a modification to the Tello3 code that allows us to preset all of our desired commands and run that set of commands at once. I will also describe what the Tello3 code does in more detail for those who would prefer to use Tello3.py and modify it themselves!
Tello3.py
Tello3.py code allows us to send commands to the drone by establishing what’s called a UDP client. We run the code by first connecting to the Tello WiFi and in the code a UDP client is created that allows us to send messages that tell the drone what to do. UDP stands for User Datagram Protocol and it’s the process by which messages (called datagrams) can be sent from one device to another. Say you wanted to send a message to a pen pal you would write their physical address which include a street name and house number on it to get it to them.
Sending messages via UDP is kind of like that except the info you need to do this is the Tello IP address and port number. UDP is often compared with TCP (Transmission Control Protocol) which is the more common communication protocol for internet connectivity. For more on UDP and TCP communication I found this video really helpful (https://www.youtube.com/watch?v=Vdc8TCESIg8). For our purposes though, the UDP communication just refers to the code we include to be able to send commands from our laptops such as “takeoff” and “up x” to the drone.
Below is a picture of the Tello3.py code lines 1-46. This part of the code is where we establish the UDP client communication. This portion of the code will remain the same in our modified demonstration/tutorial code, so its not reaally necessary to know all of the syntax/related jargon, however, I will briefly describe some of it here & link some helpful resources for those who want to learn more.
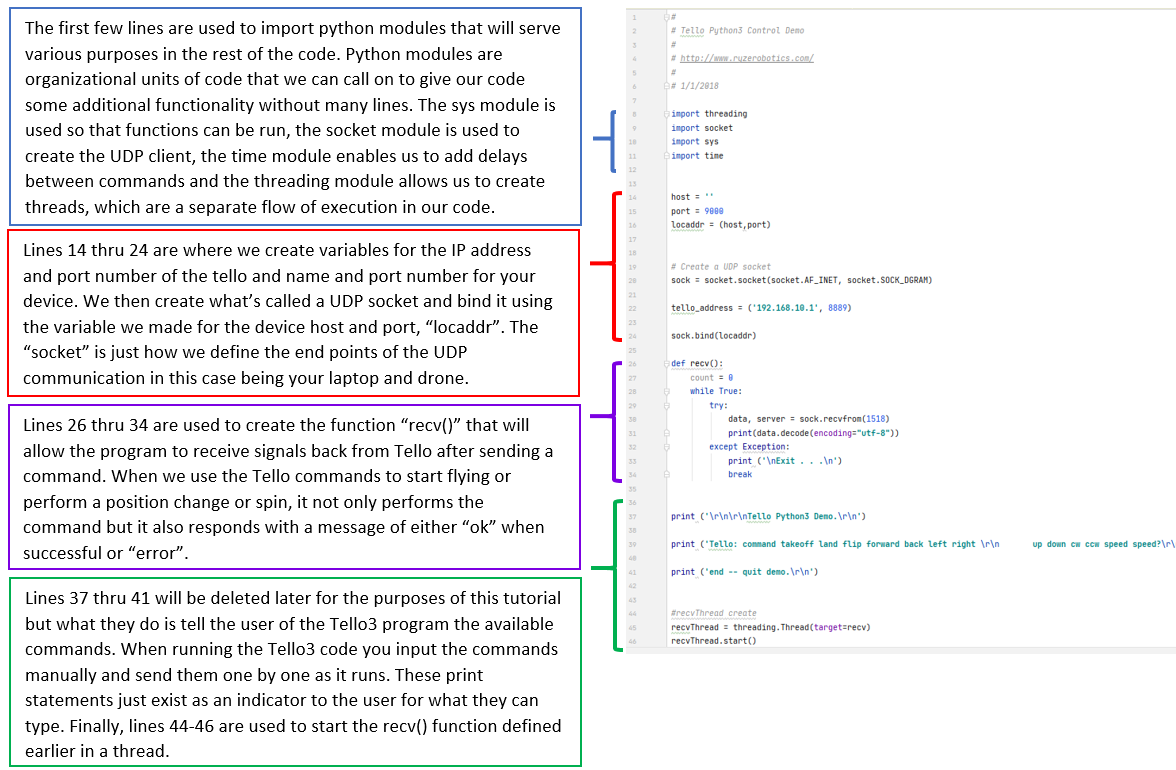
Here are some resources I found helpful for understanding some of the Python concepts used in lines 1-46:
What is a “thread”: https://realpython.com/lessons/what-is-a-thread/
Socket module and Networking stuff in Python: https://www.tutorialspoint.com/python3/python_networking.htm
Try Except statments: https://www.w3schools.com/python/python_try_except.asp
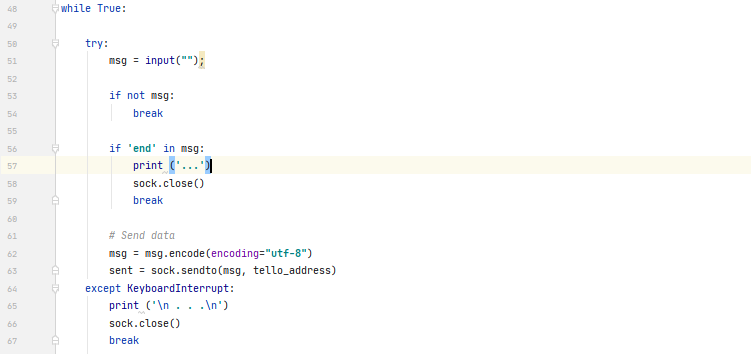
Lines 48-67 of the Tello3 code are used to send the messages we, the user, create to the address we defined for the Tello (Its IP address and port #). This code has the message defined as a user input so that they can manually type out which command to send while running it. This is the part we will change to be able to run a predefined set of commands and just watch it go hands free…or to do a tik tok dance beside it…whichever is more your thing.
Tello 3 Modification
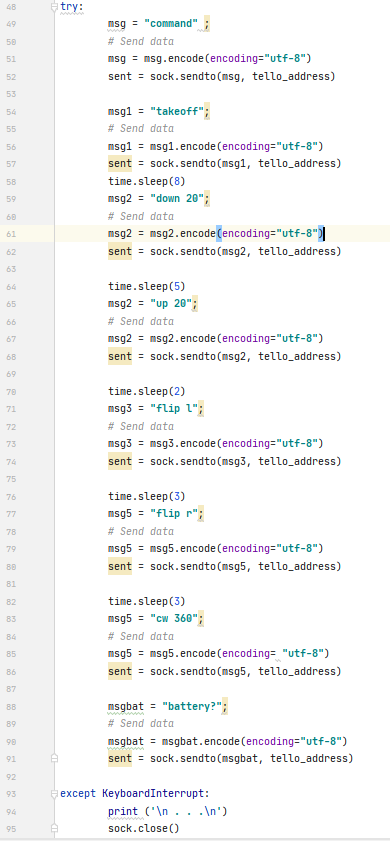
What we do to modify the code is remove the While loop and the If statement so that we’re only left with the try…except and “msg” code in lines 51, 62, and 63. What we do next is type in all the commands as different messages eg. Msg1, msg2 etc. to replace the “msg = input(“”)”in line 51. To operate the Tello the first message you send must be “command”. This is what puts the device in command mode and enables it to start executing all subsequent commands. Next if you’re planning to use any of the motion control commands you will have send the “takeoff” command for your drone to take flight before you can tell it to flip or spin or whatever you may want to have it do next. The Tello can be sent other types of commands such as set commands and read commands that can do things like tell you it’s battery percentage. In the case that you only want to use a set or read command, you’d be able to simply use the “command” message first and wouldn’t need to takeoff. Sometimes this is a good way to check the battery especially if you think you are low. The next important change here is the addition of “time.delay()”. Time.delay() allows us to input a number of seconds between executing lines of code. I haven’t gotten the addition of delays down to a science yet and adding them is usually based off trial and error for me right now. The reason they are sometimes necessary is that the command sent will return with an error when its still executing the previous command. In my experience, I would send the command that tells it to spin 720 degrees but this takes a while for the Tello to actually complete so when I send a command telling it to flip while it’s still trying to finish its spin it would send back an error message and land instead of ever flipping. The addition of delays is my current solution to this but there may be better ways, so when I figure out improvements be prepared for another blog post!
We pretty much repeat the same three lines of code to send messages to Tello for each command we want to send.
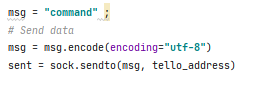
For each new command I changed the variable “msg”, but I don’t believe its really required that you do that unless you want to associate one type of command with a variable and keep reusing it throughout. In the end, my code to complete my desired flight motions was as follows:
The result was this demo:
and also ~the Tello slide~ for anyone is interested in making a tik tok dance with their device! (If you actually do please tag me bc @6dofshan on tik tok or @sincerelyshann_ for ig reels I would be so happy to see even one person actually use this & do a dance)